In the first part of this entry, (Part 1) we discussed what the IC695CPL410 is. In this entry, we will work with the CPL410 and write a short example program to get data from the controller side, perform a simple calculation in Python, and then pass the calculated value back to the controller.
What you need to get started
Apart from needing the CPL410 (obviously), you will also need a computer with the latest version of Proficy Machine Edition (PME) which at the time of this entry is version 9.5. Additionally, you will need a way to connect your computer to two of the RJ45 ports on the CPL410. There are several ways to do this including:
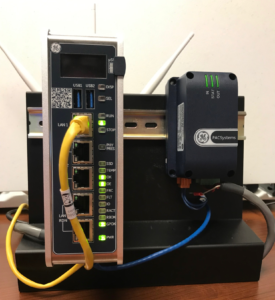
CPL410 shown with optional Energy Pack
1) Cable from your laptop RJ45 port to a DHCP capable router. Note that:
- The default address for the LAN1 port on the CPL410 is 192.168.0.100. You should either direct connect your laptop to the CPL410 and change its IP address to one you would prefer OR have your DHCP server use the subnet 192.168.0.XXX.
- The Linux side of the CPL410 is set up to receive an address from a DHCP server.
2) Use a DHCP router capable of being a wireless access point and having at least two hardwired ports. The two bullet points above still apply, but this eliminates some of the headache of switching IP addresses in Windows. You just connect your computer to the wireless signal from this router and you are connected to both ports on your CPL410. I have used serval of these devices; the one pictured here is the NETIS N300.
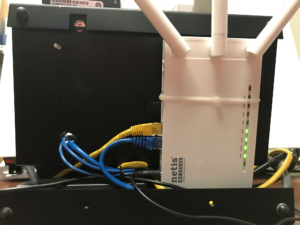
Netis N300 Router with both ports from the CPL410 connected
The connection between the two systems is ethernet via LAN1 on the front of the CPL410. To connect to the Linux side of the system, you need a separate connection to the ETH port located on the underside of the CPL410. The default IP for the front LAN1 is 192.168.0.100. The ETH port on the underside works best being connected to a DHCP server. For convenience, I recommend a setup like this one that I use
The CPL410 has a small LED display on the front of it so you can see what address is given to the Linux side.
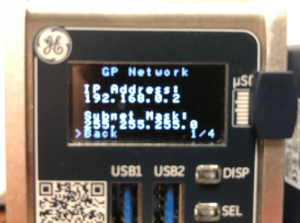
The IP address given to the Linux side
Warning – code ahead!
The following example assumes some basic knowledge of how to use Proficy Machine Edition (PME).
First, let’s open PME and create a simple project that counts from 0 to 500, then resets back to 0. I’ll set one register(‘MyInt’) to External Read Only and then create another resister(‘PythonDBL’) that is External Read/Write. Note the OPCUA Server is Enabled in the project (this is default).
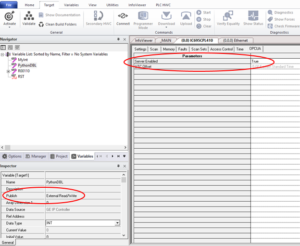
Variables and OPCUA Server Settings
For this simple application, we also need to make sure that Passwords are Disabled.
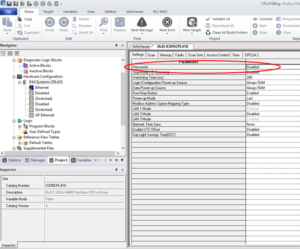
Passwords set to Disabled
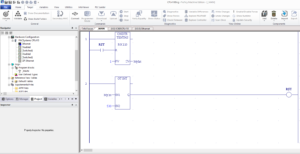
Logic to count up to 500 every tenth of a second
I’ll go ahead and Download and Start this project on the CPL410 target.
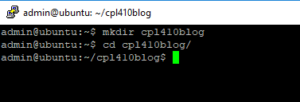
Now, on to the Linux side. I will assume that you followed Section 5.2.1 in the Quick Start Guide. The Linux side of the CPL410 should be ready for you to login using the password you set.
We will be using the same SSH Client software package called ‘Putty’ used in the QSG – there are other packages out there or you could use a computer running Linux either natively or in a virtual machine in Windows.
Once logged in, create a project directory and change to it.
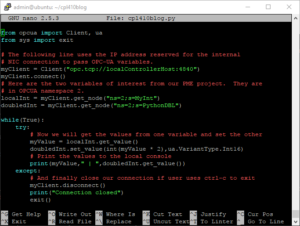
The CPL410 has Python 2 and Python 3 installed. For this tutorial, we will use Python 3. We will create a very basic script that reads in one tag, doubles it, and writes it to another tag. Now, we will create and open the python script file using the Linux text editor ‘nano’.

And here is our short and sweet script:
Save (Ctrl-O) and exit (Ctrl-X) from nano. When back at the command prompt, execute the program as a Python 3 script:
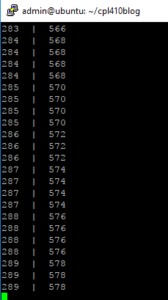
You should now see both the ‘MyInt’ variable that is generated by the controller and the ‘PythonDBL’ variable created by our script:
You can exit the script at any time by pressing ‘Ctrl-C’. Python is very readable as is, but here is an explanation of what is going on:
- The first two lines are importing the libraries we need for our project. Specifically, we are using the Client and ua objects from opcua and the exit() function from the sys module.
- Lines preceded by a ‘#’ are comments and are ignored
- We create an instance of Client (called myClient) and pass it the internal NIC to establish the link to the OPC-UA Server on the CPL410 controller side.
- We then connect to the server
- The next two lines create variables in the Python script that connect to the two variables on the OPC-UA Server we established in our PME Project. A discussion on OPC-UA is reserved for a later entry, but for now, just use “ns=2;s=theVariableName”. ‘ns’ refers to the namespace where the tags are and ‘s’ says to use the string name of the tag.
- We then enter an infinite loop to read the values over and over.
- We get the value stored in localInt (which is pointing to the MyInt tag) and put that value in myValue.
- We then set the value of myValue * 2 (as a 16bit integer) into doubledInt which is pointing to the PythonDBL tag.
- We do those last two bullets over and over until the user presses ‘Ctrl-C’
- We used a try-except in the program to catch the ‘Ctrl-C’ keyboard interrupt and cleanly close our client connection and exit the script.
If you wish, you can set a watch in PME for the two variables and see that the controller indeed gets the doubled value sent by the Python script.

This is a trivial example, but once you see how to read and write values to the controller side of the CPL410, you can use the power of open platforms like Linux and Python to enhance your control system and give you better insights to your machine data. Future articles will discuss exactly that.